
I love taking tired furniture and making it loved again. This bombay chest redo used several a-typical processes, and I am so pleased with the final product.
This page includes affiliate links. If you make a purchase using the link, I may receive a commission at no additional cost to you.
Before
I found this little number on facebook marketplace in need of some love.

I had a different idea for it originally and had wanted to try a tie-dye type top. It wasn’t looking as I had it pictured in my head so I completely switched gears.

Transformation
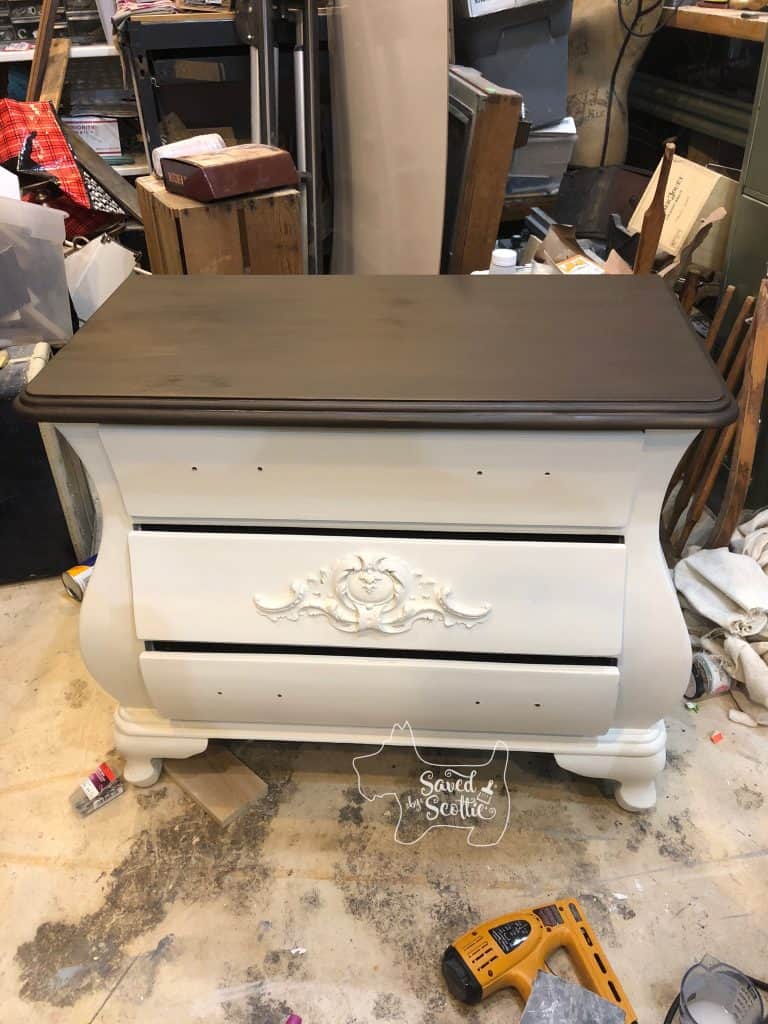
I painted the entire thing white to have a neutral starting point.

Rather dull, right? Some furniture appliques should give it some interest.

This one is made of wood glue and wood pulp. It can be attached a few different ways. I chose to use glue and weighed it down to set.
Also, the old handles were not going to work on that center drawer. Filling in the holes with a wooden dowel and smoothing them out with wood filler would give me a smooth start for new knobs.

In the morning the drawer was ready for paint.

Because this molding is made of wood products, it doesn’t require any special treatment to paint it. Though being darker, it would need an extra coat of paint. Two coats of paint later, this bombay chest redo was really coming together.


I painted the top brown for some contrast and used a glaze mixed with black paint for depth.
Digging through my stash, I found these mercury glass knobs. I knew they would do a great job of bringing attention to that middle drawer without being too show-y.

Now that the handles were attached, that odd indentation was bothering me. If you’ve been here for a while, you know I love feminine details without throwing them in your face (like my rustic glam chandelier). I decided I could add a little something to take this bombay chest redo up another notch…

…crystals. Swarovski Crystals to be precise. Swarovski is the benchmark in bling for a reason- WAY more sparkle and show-stopping power than all the others.
Quick Tip: Regular super glue will ruin the foil of crystals and rhinestones (what makes them sparkle). Be sure to use an adhesive safe to use with gems.


The knobs and crystals played off each other and made a classy, elegant, while still understated side table.
Reveal
This bombay chest redo is for sale at The Painted Pig if you know of someone who would love to have it in their home.

Please Share and Pin this Post!


6 Comments
Brooklynne Sulfridge
March 3, 2020 at 2:14 AMThank you so very much! I have one of these Bombay chests my grandmother left me and although I have painted a few pieces in the past, I have been terrified to mess this one up since it was hers. It’s actually a beautiful piece of furniture in my opinion but it had a crackle paint on it that was a nightmare to remove! I worked my butt off on it. I am the type of person who likes to sand it strip furniture down to the bare wood. Well, the top of this piece was thick MDF. So I couldn’t stain the tip like I wanted and I just couldn’t decide what I wanted to do. I didn’t want to paint it all white. I think I’m going to do just what you’ve done with the glaze and paint. Did you use a darker glaze and add black paint to it or a clear glaze? I’m assuming a dark antique glaze? I’m sorry. I’ve never used glaze before. I’ve painted a handful of pieces but nothing with glaze.
You did a wonderful job and you have saved the day for me!
Scottie
March 3, 2020 at 8:39 AMYes, I use a clear glaze and add paint or tint to it. It has a long “open time” (stays wet) so you can really move it around and make sure it looks like what you want. It’s great because rarely are there brush marks or lines in the finished product, and annoying because… patience. 🙂
I am so happy you are inspired. Just be sure you use an oil based primer on that MDF so it doesn’t swell on you. I hope you’ll show me your finished piece- Good Luck!!
Brooklynne Sulfridge
March 3, 2020 at 10:17 AMI just commented again and then saw where I should have just hit the “reply” option. Sorry. I meant to ask if you used chalk paint? It looks quite smooth but when I used chalk paint in the past I didn’t have the best luck with it. I didn’t personally feel it was easy to use but I’ve been considering trying it again and using a different brand of chalk paint. Do you have a preference on the type of paint you use to paint furniture? Thank you and I hope I’m not asking too many questions.
Scottie
March 3, 2020 at 3:05 PMI used Shabby Paints in Alamo White.
I used 400 grit sandpaper with a spray bottle of water. It’s a great way to distress and it looks very natural. If you lightly dampen the surface and lightly sand the area with the 400 grit paper, you will create a paint “slurry” and it will rehydrate the top layer and fill in the gaps and ridges created by a brush.
Brooklynne Sulfridge
March 3, 2020 at 2:26 AMI just realized I have a lot of errors in my first comment. Sorry about that. It’s quite late here in Tennessee and I’m not usually up this late so I typed it up in a hurry to rush to bed:) I just wanted to let you know how much you’ve helped me! I have searched for hours online trying to decide exactly what I wanted to do to the top of the chest and yours is gorgeous! So, I’ve now decided thanks to you!
Brooklynne Sulfridge
March 3, 2020 at 10:08 AMThanks again! I did not use an oil based primer on it! I did not know I should. I am worried now.
To be honest, I’m not even 100% certain it is MDF. From researching that’s what I had decided. I was totally expecting real wood underneath because it’s so heavy and solid feeling. It’s strange because the other areas have the wood grain look, however, I’m learning that doesn’t mean it’s necessarily real wood either, right? I just am not certain what it is. lol. As you can tell, I’m not very experienced. So, should I go buy some oil based primer and redo it?
I woke up early and have been working on it. I’ve applied a latex primer all over. Nonetheless, if you think I should get some oil based primer I will because I want it done right.
Thanks so much! I will share as soon as I complete it!